Wednesday, June 27, 2012

New Adventure and Upcoming Vacation!

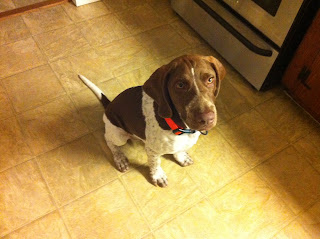
Kory and I embarked on a new adventure this week... we got a dog! We have been discussing getting a dog since March but decided that we would not do it until after I was off for the summer and we went on vacation. God has a sense of humor because the perfect opportunity for us to get a dog came a week before we left!


Kory found the dog on Tex Ags and emailed about him, we thought it was a lost cause all throughout the weekend and then on Sunday we got an email saying that if we were still interested we could adopt the dog. We contemplated over it all day Monday and decided Monday night that this was the perfect opportunity with really bad timing but our loving families were really supportive of us and everyone pitched in to help us keep the dog while we went on vacation and what not! (Secretly I think they are excited that we took this step because the next one means grandbabies... we'll hold off a little longer on that). Anyways, Monday at 6:30 we found out if we wanted the dog we needed to meet them in Navasota (about an hour away)right then. So with no food, no kennel, no NOTHING, we headed down 290 to meet our new dog:) It was love at first sight for me and for Kory (he will say he hasn't decided yet but he rode all the way home in the back with the dog... I'll call that love).  We got it all taken care of but it was a looooong night!

We are so excited to start this adventure with our new puppy... Duke!


Me and Duke!

Kory and I are heading to Moab, Utah and Durango, Colorado for a week on Friday! We will be hiking, whitewater rafting and really enjoying some cooler weather. I can't wait to share with you what we did when we get back!

Have a great 4th of July,

Amanda
Tuesday, June 12, 2012

Project Tomato! Yummmm

Maybe I can jump back on this blogging thing this summer! I mean I should have more time right? I am only working half days right now:)

This spring Kory and I decided that it would be really fun to grow our own tomatoes. Next year we would like to grow more veggies in our back yard but since this was our first time to grow ANYTHING we decided to stick to tomatoes. We bought the pots and dirt at Wal-Mart and the plants and cage at Home Depot.

We DID NOT nurture our plants from seeds, if you didn't know that is a TON of work! So we went ahead and bought plants that were already growing. Kory got the Patio tomato and I got Roma tomatoes.
Our tomatoes have grown so much since we first planted them back in April, we are actually enjoying some of our tomatoes now!

This was such a wonderful project to do together, we kind of have a competition going and mine is sprouting tomatoes like crazy!

Hope you are enjoying many summer fruits and veggies!

Amanda


Monday, June 11, 2012

Upholstered Headboard Tutorial

Ya ya, I am the worst blogger ever! Here is my blog post FINALLY!

Kory and I have a bedroom in our house that for about 6 months after moving in our house it still served as a room to house boxes and other miscellaneous items! I think it drove both of us crazy but we just did not know what we wanted to do with it. We finally decided on upholstering a headboard and attaching it to a metal bed frame. The project turned out really great and we are very happy with it. So here's how we did it:

Materials Needed:
  • 4x8 sheet of plywood $15
  • 6 washers $2
  • 2 yds upholstery fabric from JoAnns.com $50
  • polyester batting $10
  • button cover kit $3
  • 3M Spray Glue $4
  • 2x4 and bolts to attached the headboard to the bed

Step 1: When you know what size bed you will be using your headboard for cut the plywood. Decide what shape you want your headboard to be, there are so many different styles but we decided to go with a very simple one.


Step 2: Next drill the holes in the board where you want your buttons to go.  We drilled 6 holes for buttons.

Step 3: Lay the board down on the ground, spray the board with your spray glue and then carefully lay your batting down over the board making sure that there is about 2 in. of extra batting so that you can pull it over the back.
Laying batting down
After we stapled the batting to the back

Front of the headboard


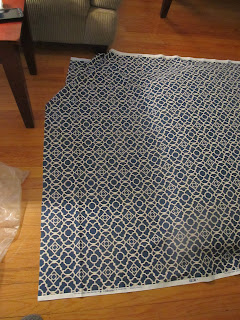
Step 4: 2 yds. of fabric was definitely more than we needed, I also needed a little bit of the fabric to do the buttons and I really wanted to have enough to make a pillow for the bed. So to make sure we used our fabric wisely, we lined it up on one side with about a 2 in overlap and then cut the other side to have a 2 in over lap. Just like the batting, spray some glue over the batting and lay the fabric on top, then staple it to the back.

Fabric laying over the batting
Extra fabric before it was cut
Back of Headboard ( I cut off excess fabric when we were all done)


Front of the Headboard
Step 5: I bought a button cover pack from Jo Ann's and covered six buttons with some extra fabric. After that, we attached a washer to some thick tread and threaded the button hole so that we could pull the buttons against the back of the headboard. I feel like this is really difficult to explain and you will probably have to figure out what works best for you!


Well that is pretty much it! We attached it to the bed frame and then we were done. I am really happy with they way it turned out and as soon as the room is ready and decorated I will post pictures of the final product!

Let me know if you have any questions,

Amanda